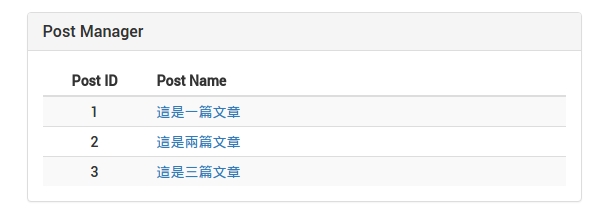
文章清單
示意圖

設定文章清單 Route
在 app/routes.jsx 使用我們自定義的 generateRoute() 方法,
path 代表網址路徑,component 則表示要 render 出來的 component。
檔案路徑:app/routes.jsx
  {generateRoute({
    paths: ['postList'],
    component: require('./postManager/components/list')
  })}
建立文章清單 View
接下來我們可以先把 View 的基本所需要的畫面建立出來。
建立一個 list.jsx 檔案在 postManager/components/ 底下,
檔案路徑: postManager/components/list.js
import React, {Component, PropTypes} from 'react';
import {Table, Panel, Col, Glyphicon, Input, Button} from 'react-bootstrap';

if (process.env.BROWSER) {
  require('postManager/styles/post.scss');
}

class Posts extends Component {

  static propTypes = {
    flux: PropTypes.object.isRequired
  }

  render() {
    return (
      <Col md={6} mdOffset={3} sm={8} smOffset={4} xs={12}>
        <Panel className='app-posts'
          header="Post Manager">
          <Table striped responsive>
            <thead>
              <tr>
                <th>Post ID</th>
                <th>
                  Post Name
                </th>
              </tr>
            </thead>
            <tbody>
              <tr className='post--row'>
                <td>1</td>
                <td>PostTitle</td>
              </tr>
            </tbody>
          </Table>
        </Panel>
      </Col>
    );
  }
}

export default Posts;
程式碼說明:
- 在 render 裡已經建立了基本的顯示雛型,用表格來存放我的們文章清單
- 使用的樣式是
react-bootstrap,並且把需要用到的 Component import 進來就好。可以參考到 ES6 的 Destructuring
多國語系設定
接下來加入多國語系,把表格的名稱替換掉
首先我們先在路徑 app/data/ 底下的 en.js 及 fr.js 加入該語系文字檔
PS:這邊我們先一次把全部需要使用到的語系加入,以便範例方便說明。
檔案路徑: postManager/components/en.js
postManager: {
      'page-title': 'Posts',
      title: 'Post Manager',
      name: 'Post Name',
      add: 'Add Post',
      edit: 'Edit',
      delete: 'Delete',
      editor: 'Editor',
      content: 'Post Content'
    }
檔案路徑: postManager/components/fr.js
postManager: {
    'page-title': 'Posts',
    title: 'Post Manager',
    name: 'post name',
    add: 'Ajouter un poste',
    edit: 'Edit',
    delete: 'Delete',
    editor: 'Editor',
    content: 'post content'
  },
之後回到 postManager/components/list.js
引用import {IntlMixin} from 'react-intl';
宣告_getIntlMessage = IntlMixin.getIntlMessage
使用this._getIntlMessage('$name')
// 略..
import {IntlMixin} from 'react-intl';
class Posts extends Component {

  _getIntlMessage = IntlMixin.getIntlMessage

  componentWillMount() {
    this.props.flux
    .getActions('page-title')
    .set(this._getIntlMessage('postManager.page-title'));
  }


  render() {
    return (
      <Col md={6} mdOffset={3} sm={8} smOffset={4} xs={12}>
        <Panel className='app-posts'
          header={<h3>{this._getIntlMessage('postManager.title')}</h3>}>
          <Table striped responsive>
            <thead>
              <tr>
                <th>Post ID</th>
                <th>
                  {this._getIntlMessage('postManager.name')}
                </th>
              </tr>
            </thead>
            <tbody>
              <tr className='post--row'>
                <td>
                  1
                </td>
                <td>
                  Title
                </td>
              </tr>
            </tbody>
          </Table>
        </Panel>
      </Col>
    );
  }
}

export default Posts;
這裡比較要特別說明如要更改網頁 title 可以在 React 生命週期 componentWillMount 取得多語系檔後再修改 title ,
以上及完成多國語系的替換,接下來說明如何呼叫 API 取得文章清單,步驟如下:
- 建立 Action 方法
- 建立 Store 修改並修改 State
- 註冊 Action 及 Store
- 修改 View(讀取 State)
建立 post Action
新增一個方法為 fetch(),並發出讀取文章清單請求,如有成功回傳則傳給 fetchSuccess Store 。
檔案路徑: postManager/actions/posts.js
import {baseUrl} from '../../../server/config/init';
import request from 'superagent';

class PostsActions {
  constructor() {
    this.generateActions(
      'fetchSuccess'
    );
  }
  fetch() {
    const promise: Function = (resolve) => {
      let that = this;
      that.alt.getActions('requests').start();

      // 發出請求
      request.get(baseUrl + 'rest/post')
      .end((error, res) => {

        // 錯無返回
        if (error) return resolve(error);

        // 成功時傳遞給 Store
        that.actions.fetchSuccess(res.body.posts);

        that.alt.getActions('requests').success();
        return resolve();
      });
    };
    this.alt.resolve(promise);
  }
}

export default PostsActions;
程式碼說明:
request.get(baseUrl + 'rest/post'):發出 HTTP GET 呼救後端 API,帶入參數為網址
建立 post Store
檔案路徑: postManager/actions/posts.js
class PostStore {

  constructor() {
    this.bindActions(this.alt.getActions('posts'));
    this.posts = []; // 存放文章清單的陣列
  }

  // 當從 Actoin 成功取得資料後並把資料傳遞進來修改狀態
  onFetchSuccess(posts) {
    return this.setState({posts});
  }
}

export default PostStore;
註冊 post Action 及 Store
檔案路徑: utils/flux.js
this.addActions('posts', require('postManager/actions/posts'));
this.addStore('posts', require('postManager/stores/posts'));
修改文章清單 View(讀取 State)
檔案路徑: postManager/components/list.js
這邊大家應該還記得我們文章清單目前是寫死的還未從資料庫取得:
<tbody>
  <tr className='post--row'>
    <td>1</td>
    <td>Title</td>
  </tr>
</tbody>
現在要替換成從資料庫取得且文章會有非常多筆,因此我們要把這部份抽離出來。 並把原先的 tbody 內容換掉用 map 去列舉 this.state.posts 內容:
<tbody>
  {this.state.posts.map(this.renderPost)}
</tbody>
新增 renderPost,這邊使用 ES6 Arrows 會自動綁定 this
renderPost = (post, index) => {
  return (
    <tr className='post--row' key={index}>
      <td>
        {post.id}
      </td>
      <td>
        {post.title}
      </td>
    </tr>
  );
}
接下來就是設定:
- 在
componentWillMount時觸發fetch()取得文章清單 - 在
componentDidMount時設定監聽 posts 這個 store 的變化,如 store 有更改就執行自定義方法_handleStoreChange - 在
componentWillUnmount時卸載監聽 posts 這個 store 的變化,釋放資源
先看以下完成程式碼,後面在說明:
import React, {Component, PropTypes} from 'react';
import {IntlMixin} from 'react-intl';
import {Table, Panel, Col, Glyphicon, Input, Button} from 'react-bootstrap';

if (process.env.BROWSER) {
  require('postManager/styles/post.scss');
}

class Posts extends Component {

  static propTypes = {
    flux: PropTypes.object.isRequired
  }

  _getIntlMessage = IntlMixin.getIntlMessage

  state = {
    posts: this.props.flux
    .getStore('posts')
    .getState().posts
  };

  componentWillMount() {
    this.props.flux
    .getActions('page-title')
    .set(this._getIntlMessage('postManager.page-title'));
    this.props.flux
    .getActions('posts')
    .fetch();
  }

  componentDidMount() {
    this.props.flux
    .getStore('posts')
    .listen(this._handleStoreChange);
  }

  componentWillUnmount() {
    this.props.flux
    .getStore('posts')
    .unlisten(this._handleStoreChange);
  }

  _handleStoreChange = (state) => {
    return this.setState(state);
  }

  renderPost = (post, index) => {
    return (
      <tr className='post--row' key={index}>
        <td>
          {post.id}
        </td>
        <td>
          {post.title}
        </td>
      </tr>
    );
  }

  render() {
    return (
      <Col md={6} mdOffset={3} sm={8} smOffset={4} xs={12}>
        <Panel className='app-posts'
          header={<h3>{this._getIntlMessage('postManager.title')}</h3>}>
          <Table striped responsive>
            <thead>
              <tr>
                <th>Post ID</th>
                <th>
                  {this._getIntlMessage('postManager.name')}
                </th>
              </tr>
            </thead>
            <tbody>
              {this.state.posts.map(this.renderPost)}
            </tbody>
          </Table>
        </Panel>
      </Col>
    );
  }
}

export default Posts;
程式碼說明:
state = {posts: this.props.flux.getStore('posts').getState().posts}
設定 state.posts 從 posts 的 store 取得
this.props.flux.getActions('posts').fetch()
呼叫 fetch() Action
this.props.flux.getStore('posts').listen(this._handleStoreChange)
監聽 posts store 有無任何狀態改變,如有則執行 _handleStoreChange
另外從以上程式碼,可以發現我們在為什麼我們在 state 去跟 store 取資料,
這跟 componentWillMount() 內的函式有什麼差別。
state = {
    posts: this.props.flux
    .getStore('posts')
    .getState().posts
  };

  componentWillMount() {
    this.props.flux
    .getActions('page-title')
    .set(this._getIntlMessage('postManager.page-title'));
    this.props.flux
    .getActions('posts')
    .fetch();
  }
因為 isomorphic 的關西,使用者(Client)造訪網頁的第一次都會由 server side render, 才傳給使用者(Client),因此我們要先設定好 state 的相關的狀態, 否則使用者(Client)第一次造訪網頁時會沒辦法正確取得內容資料。
另外除了第一次造訪網頁會由 server side render , 之後使用者在操作或轉換畫面頁面都是由 Client 的 JavaScript 去渲染(render)網頁。
由 server side render 優點是:
- SEO友好 — 傳統爬蟲是不會去執行 JavaScript 的內容,雖然現在 Google 爬蟲已經可以支援, 但如果比較其次的搜尋引擎,就會沒辦法正確抓取到網頁的內容。
- 速度快 — 因為是由 server side render 好才傳給使用者(Client),因此會比先把 JavaScript 丟給 Client 在由 JavaScript 去跟 Server 取資料再渲染(render)來的快。
下一步
完成了文章清單以後,接下來實作當點擊文章標題時會顯示該文章的詳細內容頁 文章瀏覽 。